
Maileon Marketing Automation Editor: functionality overview
The Marketing Automation Editor lets you build journeys that determine when contacts enter, which actions take place, how long contacts wait, and which path they follow.
A flow begins with a starting position, continues through connected elements, and finishes at an End point.
1. Choose a starting position
The starting position determines what causes a contact to enter the automation. Its configuration includes a Type selector; the remaining fields depend on that type.
| Name | Description | Example |
|---|---|---|
| Contact event | Starts when a new event of the selected contact-event type is received for a contact. | Follow up on a purchase event supplied by an integration. |
| DOI email confirmed | Starts when a contact grants permission through a Double Opt-In campaign. | Begin a welcome journey after confirmation. |
| API trigger | Starts for a contact referenced in an API call that triggers the automation. | Let an external application initiate a journey. |
| Contact filter assignment | Starts for contacts matching a selected contact filter, once or on a recurring schedule. | Run a scheduled journey for a defined audience. |
| Automation completed | Starts when contacts complete another automation. | Continue from onboarding into a follow-up journey. |
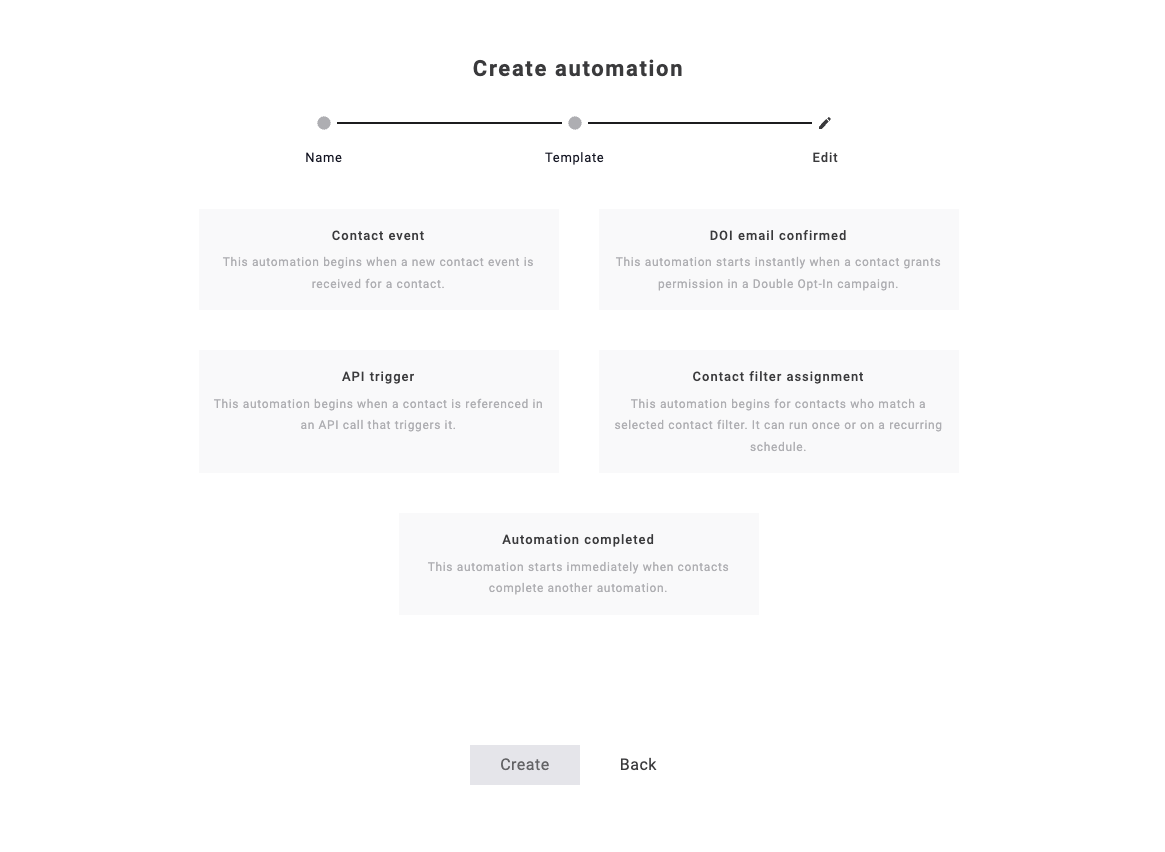
Figure 1. Starting point selection when creating a marketing automation flow
2. Find your way around the editor
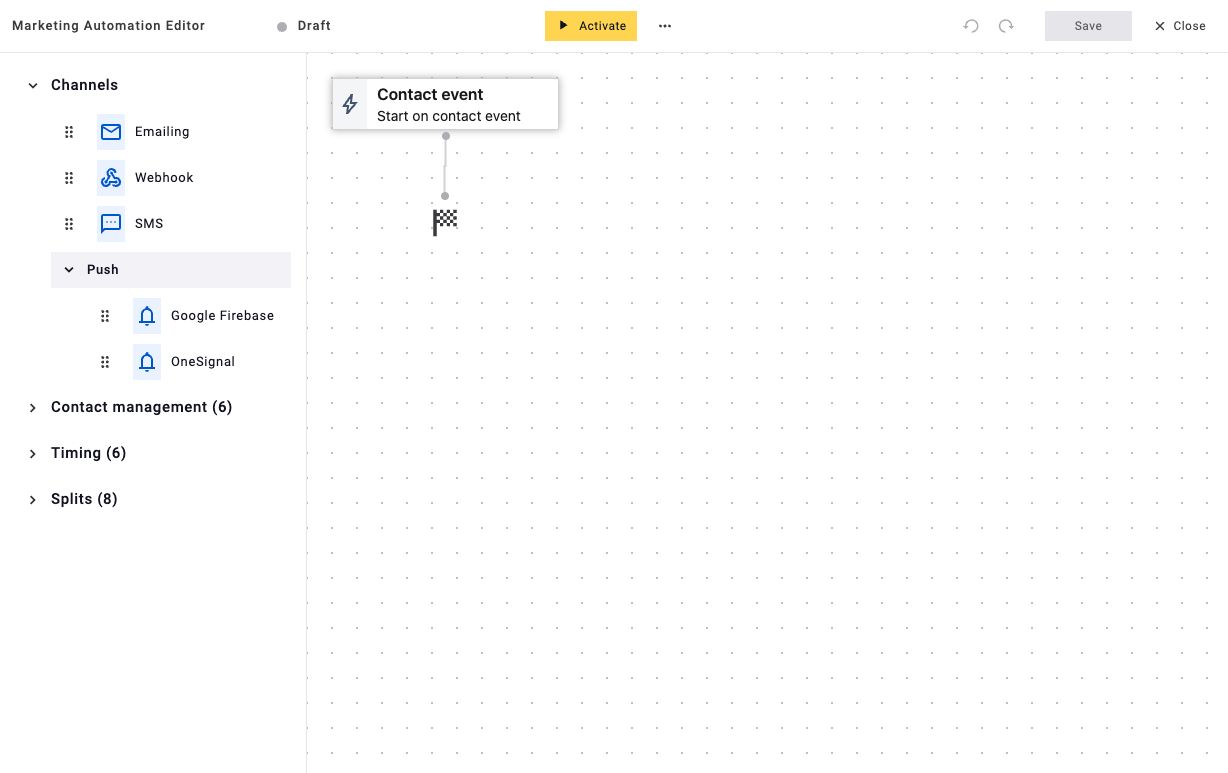
Figure 2. The element panel is on the left; the flow canvas is on the right.
| Function | Description |
|---|---|
| Element panel | Contains Channels, Contact management, Timing, and Splits. Expand a category to see its elements. |
| Flow canvas | Shows the starting position, actions, branches, connections, and endpoints. |
| Connections | Show the route contacts follow between elements. |
| Configuration panel | Opens when you select an element. Use it to edit the description and required settings. |
| Apply / Cancel | Apply an element's configuration or leave the panel without applying it. |
| Undo / Redo | Reverse or reapply edits to the flow. |
| Save | Store changes to the automation. |
| Draft / Activate | Draft identifies an automation that has not been activated. Activate is the control for activating it. |
| End | Marks the end of a path. |
Add and configure an element
- Expand its category in the element panel.
- Drag the element by its handle onto the connection where it should be inserted.
- Select the element to open its configuration.
- Complete the required fields and click Apply.
- Review the connections, then click Save.
Use clear descriptions so the purpose of each step is easy to understand on the canvas.
3. Channels
Channel elements perform communication or integration actions when a contact reaches them.
| Name | Description |
|---|---|
| Emailing | Sends a selected trigger email. Only active emails with the Marketing Automation start type can be selected. |
| Webhook | Sends data to another system through a configured webhook URL. Multiple contact-field values can be mapped to JSON attributes. |
| SMS | Provides an SMS messaging action. |
| Push: Google Firebase | Provides a push-notification action through Google Firebase. |
| Push: OneSignal | Provides a push-notification action through OneSignal. |
Configure an Emailing step
Select the required email in the Trigger field. If an expected email is missing, check that it is active and uses the Marketing Automation start type.
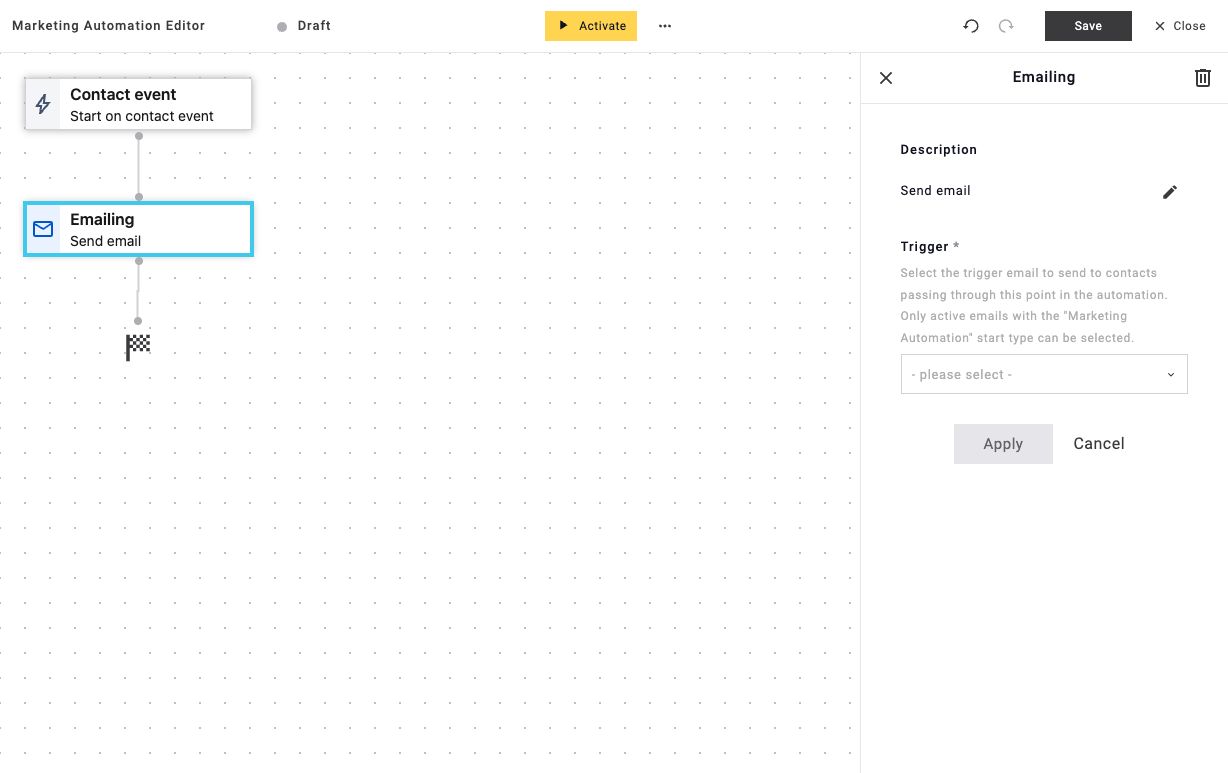
Figure 3. Selecting the trigger email for an Emailing step.
4. Contact management
These elements change data or status for contacts reaching the step.
| Name | Description |
|---|---|
| Update contact field | Changes a value stored in a contact field. |
| Modify numeric contact field | Adjusts a numeric contact-field value. |
| Update contact preference | Changes a contact preference. |
| Unsubscribe contact | Performs an unsubscribe action for the contact. |
| Blocklist contact | Adds the contact to the blocklist. |
| Delete contact | Performs a contact-deletion action. |
Check which contacts can reach a contact-management step before activating the flow.
5. Timing
| Name | Description |
|---|---|
| Wait for duration | Introduces a delay for a configured length of time. |
| Wait until date | Holds the contact until a configured date. |
| Wait until time | Holds the contact until a configured time. |
| Wait until contact event | Waits for a contact event before continuing. |
| Wait until response event | Waits for a response event before continuing. |
| Wait relative to timestamp in event | Bases the wait on a timestamp supplied in event data. |
Event conditions and timeouts
A waiting condition decides whether an incoming event qualifies. The timeout limits how long the contact waits, starting when they enter the node.
- A qualifying event sends the contact down the match path.
- An event that does not meet the condition is ignored; the contact continues waiting.
- If no qualifying event arrives in time, the contact follows the timeout path.
- An event arriving after that timeout does not change the completed routing decision.
Example: with a 48-hour timeout, a qualifying event after 12 hours takes the match path. If only non-matching events arrive, the contact takes the timeout path after 48 hours.
See waiting conditions and timeouts.
6. Splits and routing
Splits route contacts using data, events, tests, or execution limits.
| Name | Description |
|---|---|
| Split by contact field value | Routes contacts according to a contact-field value. |
| Split by contact preference value | Evaluates a single contact preference. |
| Split by interests | Combines several contact preferences to determine a path. |
| Split by contact event value | Routes contacts according to a value in contact-event data. |
| Split by contact event occurrence | Routes contacts according to whether a contact event has occurred. |
| Random split | Distributes contacts randomly between paths. |
| Test split | Creates an A/B test with a configurable test period and evaluation condition. |
| Frequency limit | Routes contacts according to how often they have executed a path segment. |
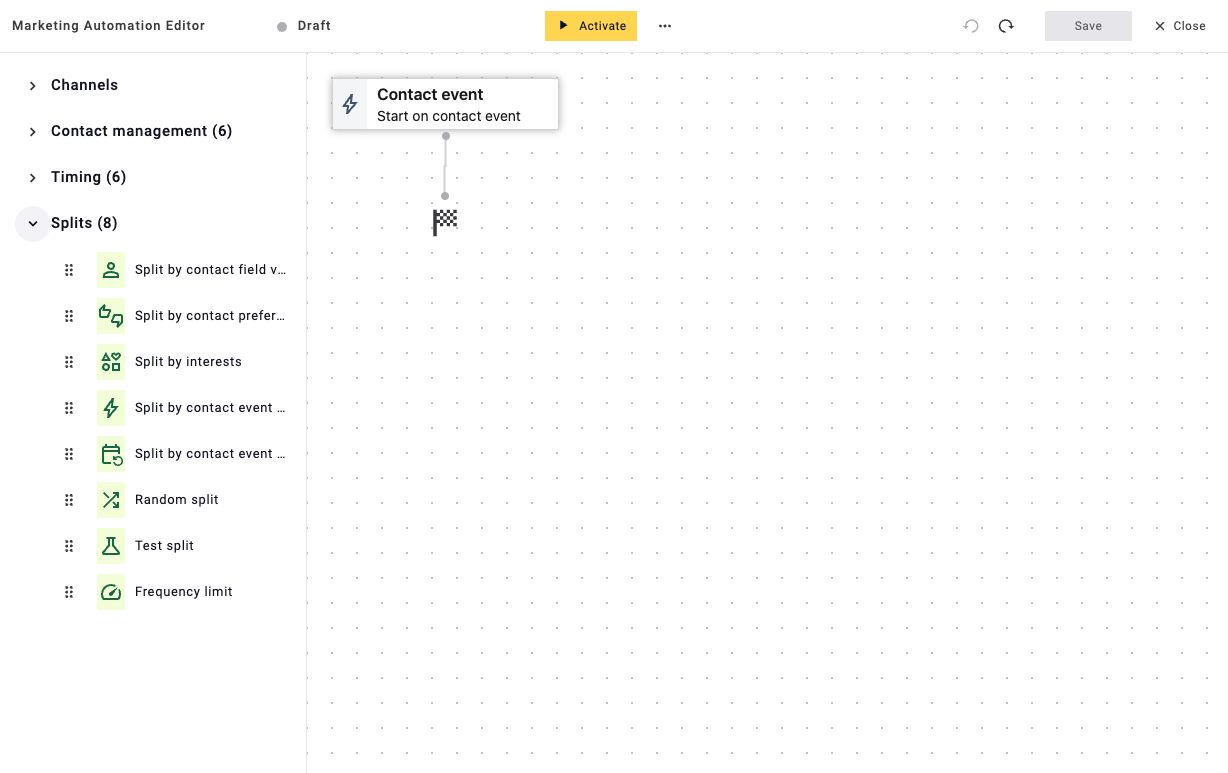
Figure 4. Available split and routing elements.
Split by interests
Build each path from preference conditions. Conditions within one block use AND; separate blocks use OR. Values can be True, False, or Not set.
Paths are checked from top to bottom. The contact follows the first matching path, or Else if none match. Paths can be added, renamed, and reordered by dragging.
Example: match contacts who prefer hiking AND camping, OR who prefer cycling. Put more specific paths above broader paths when conditions overlap.
Every condition needs a selected preference and value before saving. See the Split by Interests guide.
Test split
In the inspected editor, inserting this element created two Emailing branches. Its settings include a test period based on time after activation and/or the number of passed contacts. The test period ends when the first configured condition is met.
The panel also includes a split condition, outgoing paths, and outgoing elements. The inspected default evaluation condition was Opens.
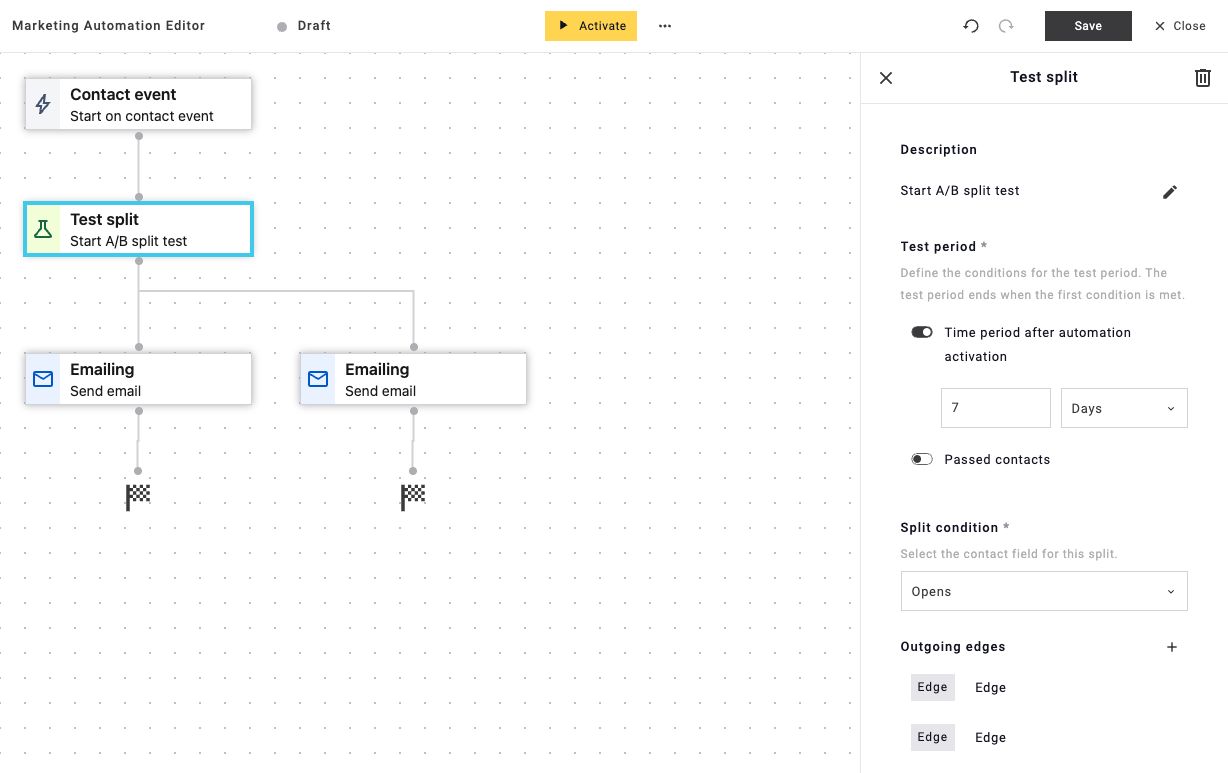
Figure 5. A/B test configuration. This example is not configured or active.
Frequency limit
Set the maximum number of times a contact may execute a path segment. The limit can be absolute or reset at a configured interval.
- Within limit: the contact has not reached the allowed number of executions.
- Limit reached: the contact is routed to the alternative path.
For example, restrict a message path to one execution per contact per week. A separate frequency-settings tutorial is available.
7. Templates and trigger-email preparation
These related guides support building and maintaining flows:
- Flow templates: start from a saved template or upload a flow-template file.
- Trigger-mailing data samples: prepare sample data from contact events.
- Trigger-mailing versioning: edit, save, and publish mailing versions.
- Switch a trigger mailing: change the mailing used in an active program.
8. Manage active automations
What pausing does
Pausing stops new contacts entering the automation. Contacts already inside continue through it.
To temporarily prevent emails to those contacts, Maileon's guide also instructs users to deactivate the linked trigger mailings. Review which mailings are connected before making changes. See how to pause an automation.
9. Monitor contact journeys
| Function | Purpose | Guide |
|---|---|---|
| Search contacts and review routes | Find a contact in an active automation and inspect the route they followed. | Contact routes |
| Automation history in a contact profile | Review automation activity from the individual contact's profile. | Contact history |
10. Example journey and final review
Contact event → Emailing → Wait for duration → Split by interests → Relevant follow-up → End
The event admits the contact, Emailing sends the first message, the wait controls the delay, and the split selects the appropriate follow-up.
Before activation, check the entry rules, required fields, selected messages, timing, branch priority, fallback paths, and any contact-data actions. Save the configuration and test the intended behaviour with an appropriate test setup.
Documentation scope and references
This overview combines inspection of the Maileon editor on 2 October 2026 with the linked support material. Screenshots show an inactive demonstration draft. Available elements were inventoried and selected settings inspected; no live automation execution was tested. Detailed SMS and push configuration, and A/B winner selection and post-test routing, are not covered.
For further walkthroughs, see the Marketing Automation FAQ index.